
In this guide, I walk you through cutting metal roofing safely and efficiently. I’ll share the latest manufacturer recommendations and real-world roofer tips. You’ll learn which tools to use – from aviation snips and nibblers to circular saws with metal-cut blades – and which to avoid (abrasive grinders or torches). We’ll cover step-by-step procedures: from preparing and measuring, to securing panels, making the cut, and protecting the raw edges. I’ll explain the PPE and OSHA safety rules every roofer needs (eye/ear protection, gloves, harnesses).
We’ll also tackle edge protection (applying touch-up primer or sealant on cut edges to prevent rust) and common pitfalls (like cutting on the roof or leaving metal chips behind). Detailed tables compare tools (pros/cons/uses) and panel types vs methods. A workflow chart visualizes the cutting process. Throughout, I share pro tips (e.g. clamping tricks, cool-cut blades) from the field. By the end, you’ll have a practical, actionable roadmap for any metal roof cutting job – delivered in a friendly roofer’s voice with cited best practices.
Tools & Methods for Cutting Metal Roofing
When I’m on the roof, using the right tool is everything. The manufacturers and experts I trust all emphasize tools that “wipe” the Galvalume or coated finish across the cut edge, protecting it from rust. Aviation snips (hand snips) are my go-to for tight, short cuts (like around vents or edges). They cleave the metal cleanly and preserve the coating. I keep both left-cut (red) and right-cut (green) snips on the belt for curves or small penetrations. For longer straight cuts, electric shears are fantastic: they remove a tiny strip of metal but leave perfectly flat, smooth edges while also wiping the coating. They’re great at door frames and long panel edges. Battery-powered mechanical shears (attachments for an impact gun) are another curved-cut trick – I use them to bevel-trim standing-seam panels at hips and valleys. Like the others, they pull the coating over the cut edge too.
For cutting through corrugated or ribbed panels (especially across the ribs), I often break out the nibbler. It literally “nibbles” out half-moon chips, cutting “like butter” and effectively wiping the Galvalume. The downside is the thousands of tiny chips it spits out – I always clamp a magnet tray or tarp to catch those so they don’t scratch the roof. If I have a ton of corrugated cuts, investing in a $500+ nibbler pays off in speed and precision.
Skill saws (circular saws) can also do metal, but only with a special blade. You want a carbide-tipped, high-tooth-count blade that cuts cool. In practice, I use a 7¼″ circular saw with a 60-80 tooth metal blade. It slices sheet steel fast and can cut diagonals on a ribbed panel or straight lines. But be warned: regular wood blades (even run backwards) or grinders will shred the coating and create rust. In fact, MBCI and Star Building Systems both caution NEVER to use torches, reciprocating saws, abrasive blades, hacksaws or grinders on Galvalume panels. They melt or burn off the zinc/aluminum coating, leading to immediate rust. In a pinch some roofers might use an angle grinder with a non-ferrous or diamond blade for tiny cuts, but I almost never do – the sparks fly everywhere and you have to be very careful.
Tool vs Pros/Cons/Best Use
| Tool | Pros | Cons | Best Use |
| Aviation Snips | No electric power needed, cuts small curves cleanly. Wipes coating. | Not for long/straight cuts (slow for large sections). Small cut length. | Trimming near penetrations or angles on panels. |
| Electric Shears | Fast, straight cuts, leaves flat edges, wipes coating. | Requires power/battery, removes metal strip (waste). | Long straight cuts on panels (gutters, wall panels). |
| Mechanical Shears | Lightweight add-on, good for angled/bevel cuts, smooth edge, wipes coating. | Slower on thick metal, wavy edge if cutting straight. | Bevel cutting on standing seam panels (valleys, hips). |
| Nibblers | Cuts corrugated/ribbed metal quickly, very precise; wipes coating. | Expensive tool; produces lots of metal chips to clean up. | Cutting corrugated or ribbed panels for openings (windows, doors). |
| Circular Saw | Versatile, cuts straight or angled; fast on large sheets. | Must use correct blade; throws sparks and swarf. | Straight cuts on sheeting; remember to use cool-cut blade. |
| Angle Grinder | Cuts any angle, portable. Can use cutoff wheel or metal blade. | Fires sparks everywhere; abrasive wheels melt coating (avoid). | Only small cuts or notches when no better tool is at hand; use a non-ferrous blade or cutoff wheel with great care. |
| Electric Shears (Toroid) | Not recommended on coated panels. (Example: Thorn Shear) | Destroys coating edge, voids warranty. | Never use on Galvalume/painted panels. |
| Torch or Plasma | Cuts very fast through any metal. | Not allowed – totally removes coating, causes instant rust. | Absolutely avoid on roofing panels. |
Panel Types & Cutting Guidelines
Standing-Seam & Concealed-Fastener Panels
Panels like standing seam or double-lock require clean, precise cuts because the edges often interlock or sit under trim. For these, I use aviation snips or mechanical shears for small adjustments (wiping the coating). For long cuts on a seam panel, I use an electric shear or a circular saw. When sawing, I clamp a straightedge guide to avoid crooked cuts and use a fine-tooth (60–80 tooth) blade that cuts cool. I do not score or scratch the panel; I cut fully through in one pass. After cutting, I always file or deburr sharp corners and apply a touch-up zinc primer (often provided by the panel manufacturer) to the bare steel edge, since the factory coating is now thin at the cut.
Corrugated & Exposed-Fastener Panels
Ribbed panels (like PBR, box rib, V-lock) can use nibblers or saws. For straight rip cuts along the panel length, a circular saw with guide often works best – just remember to collect the swarf. Every source warns: never cut panels up on the roof or above other panels, because flying metal chips (swarf) will land on the roof and rust spots can form. I cut panels on the ground with supports under the sheet, and catch chips with a brush or magnet. For cuts across ribs, a nibbler is ideal (it “punches” out chips and wipes the cut edge). An angle grinder with a cutoff disc can do small notches, but use it sparingly due to high heat.
Coated & Stone-Coated Panels
“Coated panels” usually means Galvalume or paint-coated steel, and possibly stone-coated steel. All the above advice applies: always use tools that preserve the coating at the edge. For specialty stone-coated tile sheets, manufacturers often supply a dedicated cutting tool (like Malco’s “stone coat cutter”). If such a tool isn’t available, follow the same rules: cold blades and collect dust. In all cases, after cutting I seal the edge with the appropriate roof primer or silicone to prevent corrosion.
Panel Type vs. Recommended Cutting Method & Cautions
| Panel Type | Recommended Method | Caution / Notes |
| Standing Seam | Aviation snips, electric/mech shears, fine-tooth circular saw. | Avoid abrasive tools; ensure a square, clean cut (measure twice). Touch-up primer on cut edges. |
| Exposed Rib (PBR, Box) | Nibbler for crosses; circular saw for long straight cuts. | Clamp guide for saw; collect swarf debris. Deburr edges. |
| Corrugated Panels | Nibbler, tin snips (larger cuts), circular saw (straight cuts). | Watch rib depth – no twist. Contain nibble chips to avoid scratching roof. |
| Painted/Stone-Coated | Use tooling above with non-ferrous blade (snips/shears/nibbler preferred). | Wear a mask for zinc dust. Always reseal cut edges (prime/paint). Stone-coated often requires manufacturer cutter. |
| Metal Shake/Tile | Special “stone coat” cutters or snips. | Chips of stone can be sharp – wear heavy gloves. Use manufacturer-recommended cutters when possible. |
Cutting Workflow (Step-by-Step)
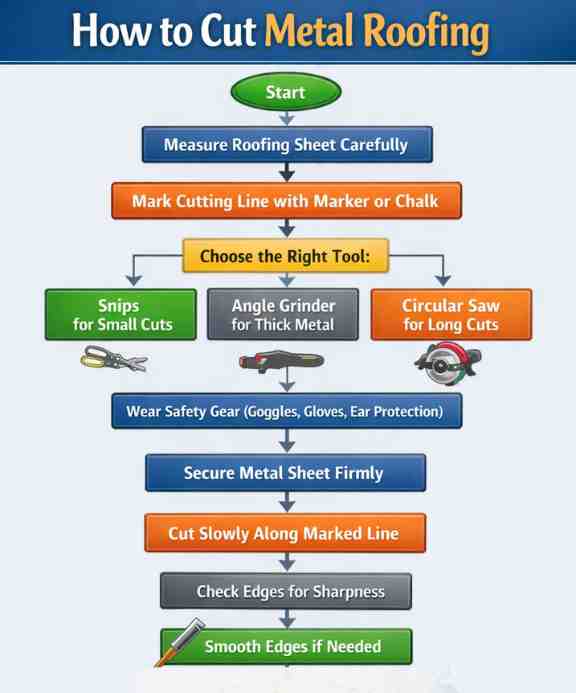
This process covers measuring, choosing the right tool, cutting carefully, and finishing edges—while always putting safety first by securing the sheet and protecting yourself.
Safety Protocols & PPE
Cutting metal on a roof can be hazardous, so OSHA-approved PPE is a must. I always wear safety glasses (wrap-around style) to stop any flying chips, and often a clear face shield when using a saw or grinder. Gloves are essential – I prefer cut-resistant or heavy leather gloves with grip to handle sharp panels and prevent heat burns. Because power tools can be loud (especially electric shears and saws), I use hearing protection (foam earplugs or earmuffs) during extended cutting.
If I’m cutting a thick Galvalume sheet or coated steel, I’ll wear a dust mask or respirator – the onevan guide warns that galvanized metal can give off zinc oxide fumes when cut hot. Always keep the work area tidy to prevent trips (OSHA notes keeping cords and nails cleared). And of course, when working at height: use fall protection harnesses and toe boards per OSHA 1926.500 if on a ladder or roof.
Protecting Cut Edges & Edge Finishing
One of the trickiest parts is ensuring the cut edge doesn’t corrode. In the factory, cuts are made on coated coil, “wiping” the coating across the edge. In the field, we don’t have that luxury, so I take extra steps. First, I always deburr and file the edge to remove sharp metal bits. Then I use a galvanized steel touch-up paint (or a zinc-rich primer) on the bare metal. For painted panels, use a matching roof paint on the edge. Some installers also seal the cut edge with silicone or a metal roof sealant tape. After fastening cut pieces, I check that no stray metal chips remain on the roof (use a magnet sweeper).
For fasteners: when cutting panel ends, be sure to use the same type of screws with neoprene washers that the panel manufacturer specifies. Overlapping edges should have closure strips sealed with butyl tape to prevent water ingress. Always follow the roofing system’s details for end laps and joints (e.g. a standing seam termination should use a hemmed edge or trim).
Common Mistakes & Troubleshooting
In my years on roofs, I’ve seen a few mistakes crop up:
- Using the wrong blade or tool: I’ve torn the coating off an edge by using a dull wood blade backward, only to see rust appear in weeks. Always use a sharp, metal-cutting blade.
- Cutting on the roof: When beginners cut panels up on the roof, they inevitably let hot swarf fall on the surface. A client learned the hard way – months later, rust spots showed where we’d cut a gutter. Lesson: always cut at ground level and catch debris.
- Forgetting PPE: I once nicked my hand on a sheared edge without gloves – a painful lesson that cut-resistant gloves really are worth it.
- Bad measurements: “Measure twice, cut once” is golden. A mis-cut panel can mean reordering or a bad patch job. I triple-check my marks with a square or straightedge before any cut.
- Loose sheets: A sheet that’s not properly clamped will vibrate and give a jagged cut. I use C-clamps or heavy weights at the ends for long cuts.
Pro tip: If I have multiple panels to cut identically, I stack them (clamped) and mark and cut together. This saves time and ensures uniform pieces. Just be careful with thick stacks – the saw might bind.
Tool Checklist (Quick)
- Measuring/Marking: Tape measure, chalk or marker. (Metal needs a visible marker, not pencil.)
- Cutting Tools: Aviation snips (left/right), powered nibbler, electric shears, and a circular saw with carbide blade (60–80T).
- PPE: Safety glasses + face shield, cut-resistant gloves, ear protection, dust mask. Hard hat and fall harness if on roof.
- Support Gear: Sawhorses or benches, clamps (C-clamps or quick-grip), straightedge guide (straight batten or level).
- Finishing Supplies: File/debur tool, zinc-rich primer/paint, touch-up brush, metal sealant tape or silicone.
- Cleanup: Shop vacuum or magnet sweeper to gather metal chips (swarf).
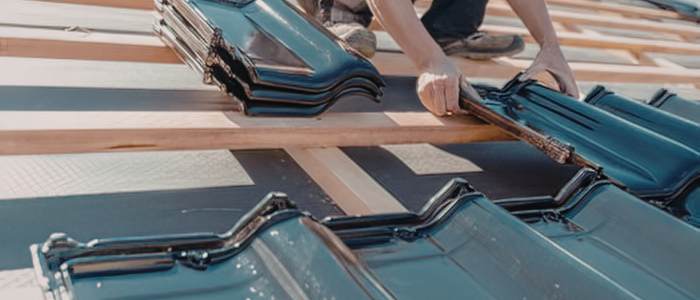
Image Guidance: Include clear photos of each tool in use (e.g. snips cutting panel edge, circular saw with blade), an example of proper PPE (helmet, gloves, glasses), and the flowchart/diagram above. For instance, a high-resolution photo of a roofer cutting a panel with a circular saw (with safety gear on) helps readers visualize.
FAQs
What is the best tool for cutting metal roofing?
The best tool depends on the type of cut you need. Tin snips are great for small cuts, while a circular saw or angle grinder works better for long, straight cuts on thicker metal roofing panels.
Can I cut metal roofing without professional tools?
Yes, you can cut metal roofing with basic tools like tin snips for small projects. However, for larger jobs or thicker panels, using power tools ensures cleaner cuts, saves time, and reduces the risk of damaging the material.
How do I cut metal roofing safely at home?
Always wear safety gear like gloves and goggles, secure the metal sheet firmly, and cut slowly along marked lines. Stand to the side to avoid debris, and smooth sharp edges afterward to prevent injuries during installation.
Final thought
In summary, cutting metal roofing is a careful blend of the right tools, technique, and safety mindset. As a roofer, I always aim to mimic factory-quality cuts in the field: clean edges, protected coating, and zero shortcuts. Follow these guidelines and manufacturer advice, and your cut panels will stay rust-free and fit perfectly. Happy cutting, and stay safe up there on the roof!