
Wind damage is one of the most alarming things that can happen to your home. But here’s the truth: if you stay calm, move in the right order, and get the right people involved quickly — this is a very manageable situation. This guide walks you through every step, from the moment the storm passes to the moment repairs begin.
Do not go outside or onto the roof until the storm has fully passed and you’ve confirmed there are no downed power lines nearby. Wind-damaged roofs can have structurally compromised sections that aren’t visible — even after the storm. Falling debris, unstable sheathing, and live electrical hazards are all real risks. Stay inside, stay away from the damaged area, and let the storm fully clear before doing anything else.
Why Wind Damage Is Different
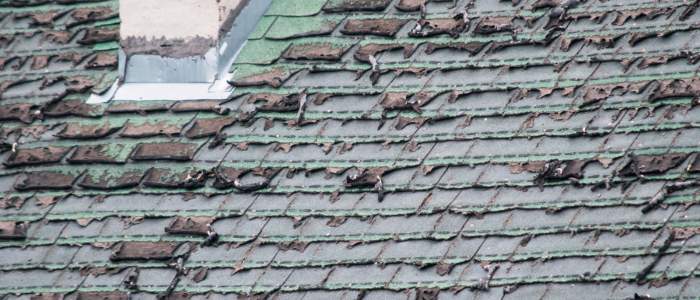
You hear it before you see it. That unmistakable sound — a deep groan, a crack, a sudden absence of sound from the wind — and then you look up through the skylight or step outside after the storm and see it. A section of your roof. Gone. Maybe it’s shingles scattered across the yard. Maybe it’s an entire section of decking. Maybe it’s the ridge cap, or a corner of the overhang sitting in the neighbour’s garden.
Whatever the scale — your first instinct might be panic. And I understand that completely. But here’s what I’ve learned from years of responding to these calls: the homeowners who handle wind damage best are the ones who slow down, think clearly, and work through it one step at a time. Not because they aren’t frightened, but because they know that calm, deliberate action in the first few hours makes an enormous difference to the outcome.
Wind damage that’s addressed quickly and correctly almost always costs less, repairs faster, and results in better insurance settlements than damage that’s handled in a panic — or worse, left unaddressed while you “figure things out.” The storm is over. Now you take back control.
7 Steps to Take Right Now
These steps are ordered by priority. Read them all the way through once before acting — understanding the full sequence helps you move faster and make better decisions under pressure.
Safety First — Non-Negotiable
Stay Inside Until the Storm Has Fully Passed
This sounds obvious — but it’s the step most people skip too early. A lull in the storm is not the same as the storm being over. Wait until conditions are clearly calm and stable before going outside. When you do go out, scan the perimeter of your home first for downed power lines — if you see any, stay away and call your utility company immediately before touching anything. Check the exterior from a safe distance before approaching the damaged area. Wind-damaged roofing can have hidden structural weakness that makes sections unstable to approach from below.
Downed power lines near your home are a life-threatening emergency. Call your utility provider first — not after you’ve checked the roof. Do not approach within 30 feet of a downed line.
Structural Safety
Check for Structural Compromise Inside Your Home
Walk through the interior of your home carefully. Look for ceiling sagging, cracked walls, or doors and windows that have shifted in their frames — these can all indicate structural movement. If any section of ceiling looks significantly bowed or sagging with water weight, avoid that area and follow the ceiling bulge relief steps in our emergency roof leak guide. If walls have visibly cracked or shifted — particularly near the damaged area — exit and call a structural engineer or emergency services before re-entering. This is rare with typical wind damage, but not unheard of after severe storms.
If you smell gas after the storm — do not touch any electrical switches. Leave immediately and call your gas utility from outside the home.
Contain the Damage
Protect Your Interior From Water Intrusion
Any opening in your roof — however large or small — is now a direct water entry point. Move furniture, electronics, documents, rugs, and valuables away from the affected area immediately. Cover anything you can’t move with heavy plastic sheeting. Place buckets and large containers under any active drips. If rain is already coming in or imminent, your priority is protecting the interior while you work through the remaining steps. Water compounds wind damage dramatically — a section of missing roof that’s also been rained on is a far more expensive repair than one that was tarped before the next rain event.
Keep rolls of heavy-duty plastic sheeting in your emergency kit. In a wind damage event, they can protect thousands of dollars of belongings in minutes.
Before Anything Else
Document Every Inch of Damage — Photos & Video
Before a single piece of debris is moved, before anything is cleaned up, before any temporary repairs are made — document everything thoroughly. Walk the perimeter of your home and photograph the exterior damage from multiple angles. Photograph the interior — any water intrusion, ceiling damage, affected walls, and damaged belongings. Video is equally valuable — walk the damage slowly and narrate what you’re seeing and where. Photograph any roofing material that has landed in the yard or on neighboring properties. This documentation is the foundation of your insurance claim, and its quality directly affects your settlement.
Include a timestamped photo of a nearby object (like a newspaper or your phone’s date display) at the start of your documentation session to establish the date and time clearly for your insurer.
Get Help Fast
Call a Licensed Roofer for Emergency Tarping
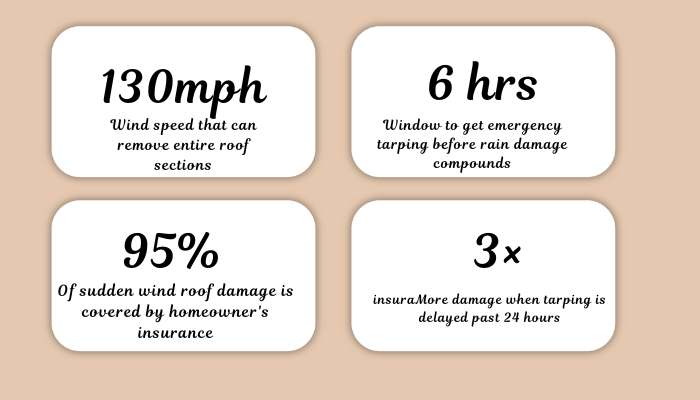
This is your most time-sensitive call. A properly installed emergency tarp over the damaged area is the single most important thing that can happen in the next few hours — it stops further water intrusion and protects the structural integrity of the roof deck and framing until permanent repairs can be scheduled. Most reputable roofing contractors offer 24/7 emergency tarping service and can mobilize within hours of your call. When you call, be specific: tell them the approximate size of the missing section, whether rain is imminent, and whether you’ve noticed any structural concerns inside. The more detail you provide, the faster and better-prepared they’ll be when they arrive.
Ask specifically for emergency tarping service as a standalone callout. This is different from scheduling a full repair — it’s an immediate protective measure that stops the clock on further damage.
Protect Your Claim
Notify Your Insurance Company
Call your homeowner’s insurance company as soon as possible — ideally within 24 hours of the damage occurring. Most policies have a notification requirement, and missing the window can complicate your claim even when the damage is clearly covered. Give them a factual account of what happened: the date and time of the storm, the nature of the damage, and what steps you’ve taken so far. Ask them to walk you through their claims process and find out specifically what they need from you. Keep a record of every conversation — the time, the representative’s name, and what was discussed.
Wind damage to roofs is one of the most commonly covered claims under standard homeowner’s policies. You are very likely covered — but the quality of your documentation and how promptly you notify them both affect your outcome significantly.
Before Permanent Repairs
Get a Full Professional Damage Assessment
Once the emergency tarp is in place and your insurer has been notified, the next priority is a complete damage assessment by a licensed roofing contractor. Wind damage is rarely limited to just what’s visibly missing — adjacent shingles are often lifted and resealed by the wind in a way that looks intact but has broken the adhesive bond, making them vulnerable to future uplift. The decking beneath the missing section may have been compromised. Flashing may have been dislodged. A thorough professional inspection identifies all of this before permanent repairs begin — ensuring you don’t pay twice for the same problem. See our complete roof damage guide for what a thorough assessment should cover.
Request that your roofer be present during the insurance adjuster’s site visit. A knowledgeable contractor on your side ensures the full scope of damage is captured in the adjuster’s report — not just what’s most visible.
Wind damage always looks worse than it is from the outside — and almost always costs more than expected when left unaddressed. Speed of response is the single most important variable in your outcome.— Mike Callahan, Licensed Master Roofer
Know What You’re Dealing With
Types of Wind Roof Damage
Not all wind damage looks the same — and understanding what you’re dealing with helps you communicate clearly with your contractor and insurer, and set realistic expectations for the repair scope and timeline.
Missing Shingles
The most common form of wind damage — individual shingles or groups of shingles lifted and removed by sustained or gusting wind. Even a few missing shingles represent direct water entry points that need immediate attention. See our roof damage guide for full context.
Lifted & Resealed Shingles
Wind lifts shingles and then lays them back down — they look intact from the ground but the adhesive seal strip is broken. These shingles are structurally vulnerable and will lift again in the next storm. Only a hands-on inspection finds them.
Damaged or Missing Decking
In severe storms, sections of roof sheathing (OSB or plywood decking) can be removed entirely along with the shingles above them. This is a more serious repair requiring structural work before any new shingles can be installed.
Displaced Flashing
Wind pries flashing loose around chimneys, skylights, vents, and wall intersections — creating direct water entry points that aren’t always visible from the ground. Flashing failure is responsible for a significant portion of post-storm interior leaks.
Ridge Cap Damage
The ridge cap at the peak of the roof is one of the most wind-exposed elements on the entire structure. Missing or lifted ridge cap shingles leave the highest, most vulnerable point of your roof unprotected — a priority repair regardless of storm severity.
Structural Uplift
In the most severe storms — tornadoes, Category 2+ hurricanes, or intense derechoes — wind uplift can compromise the connection between roof framing and wall structure. This requires structural engineering assessment before any roofing repair begins.
| Damage Type | Visible From Ground? | Water Risk | Urgency | Typical Repair Cost |
|---|---|---|---|---|
| Missing Shingles (few) | Often yes | Immediate | Emergency | $150 – $500 |
| Missing Shingles (widespread) | Yes | Immediate | Emergency | $500 – $3,000 |
| Lifted & Resealed Shingles | Rarely | Next storm | Within 1 week | $300 – $800 |
| Missing Decking Section | Yes | Immediate | Emergency | $800 – $4,000+ |
| Displaced Flashing | Rarely | Next rain | Within 48 hrs | $200 – $700 |
| Ridge Cap Damage | Sometimes | Next rain | Within 48 hrs | $300 – $1,000 |
| Structural Uplift | Sometimes | Immediate | Emergency | $2,000 – $15,000+ |
Stop the Bleeding
Temporary Protection Options
Getting your roof weatherproofed as quickly as possible after wind damage is the single most important thing you can do to control the cost and scope of repairs. Here are your options — from most to least effective.
Temporary Protection — Best to Good
- Professional emergency tarping (best option): A licensed roofer installs a heavy-duty polyethylene tarp that is properly secured, overlaps the damage by several feet in all directions, and is anchored to prevent wind uplift. This is not the same as a homeowner throwing a tarp over the hole — professional installation ensures it stays in place through subsequent weather events. Cost: $300–$800 typically. Worth every dollar.
- Plywood sheeting over large openings: For sections of missing decking, a plywood panel cut to size and fastened over the opening provides temporary structural protection. This is best done by a contractor — improperly secured plywood in a subsequent wind event becomes a projectile hazard.
- Roofing tape over small gaps: Self-adhesive butyl or rubberized asphalt roofing tape can seal small cracks, exposed underlayment tears, or gaps around lifted flashing temporarily. Works best on a dry surface. Available at hardware stores.
- Interior ceiling tarp: If exterior access isn’t safe or available, a tarp laid across the attic floor beneath the damaged section catches water before it reaches your ceilings and living spaces — buying valuable time while you wait for professional help.
Important:
Do not attempt to get on a damaged roof to apply temporary repairs. Wind-damaged decking and framing can be structurally compromised in ways that aren’t visible from above. A roof that supported your weight before the storm may not support it after. Professional emergency tarping teams have the safety equipment and experience to assess load-bearing capacity before proceeding. Your safety is worth more than the cost of any repair.
Get What You’re Owed
Your Insurance Claim Guide
Wind damage to a roof is one of the most straightforward insurance claims a homeowner can make — but how you handle the process determines whether you get a fair settlement or leave money on the table. Here’s how to do it right.
Wind Damage Insurance Claim Checklist
- Notify your insurer within 24–48 hours — most policies have a reporting window. Missing it can complicate your claim even when damage is clearly covered.
- Never start permanent repairs before the adjuster visits — emergency tarping and water containment are fine and expected. But don’t let a contractor begin permanent repairs until after the adjuster has assessed the damage. Doing so can reduce your settlement.
- Keep all roofing material that came off — shingles in the yard, sections of ridge cap, any flashing that was blown loose. These are physical evidence for your claim. Don’t throw them away.
- Get your contractor’s written estimate before the adjuster arrives — this gives you a documented, professional benchmark to compare against the insurer’s offer. Underpayment on wind damage claims is common.
- Request your roofer be present at the adjuster inspection — a licensed contractor who understands the full scope of wind damage (including the less visible damage to lifted-and-resealed shingles) advocates for a settlement that covers actual repair costs.
- Save every receipt — emergency tarping, temporary materials, hotel accommodation if the home is uninhabitable. These are recoverable costs under most policies.
- Photograph the damaged material in the yard — blown-off shingles or decking sections photographed on the ground alongside the corresponding gap in your roof create a clear, irrefutable record of what happened.
Pro Tip — If Your Settlement Seems Low
You have the right to dispute your initial settlement offer. Submit a supplemental claim with additional documentation — particularly the contractor’s written estimate — and if needed, hire a public adjuster who works on your behalf rather than the insurer’s. The gap between what insurers initially offer on wind damage claims and what professional repairs actually cost can be significant. Don’t accept the first number without reviewing it carefully against your contractor’s assessment.
Need Emergency Roof Repair?
Every hour without a tarp is another hour of risk. Get a licensed roofer on the phone right now and get your home protected before the next rain arrives. Call for Emergency Roof Service →
FAQs
Is wind damage to my roof covered by homeowner’s insurance?
In the vast majority of cases, yes. Wind damage is one of the most commonly covered perils under standard homeowner’s insurance policies. The key requirements are that the damage was sudden and caused by a covered event (windstorm, hurricane, tornado), and that you notify your insurer promptly and document the damage thoroughly. Check your specific policy for any wind deductibles — some policies in high-wind regions carry a separate deductible for wind or hurricane events.
Can I go on my roof to check the damage myself?
Not immediately after the storm — and I’d advise against it even once conditions have cleared unless you are experienced and have proper safety equipment. Wind-damaged decking and framing can be structurally compromised in ways that aren’t visible from above. A section that looks solid may not support your weight. Have a licensed roofing contractor conduct the initial exterior assessment — their experience and equipment make this something they can do safely and thoroughly.
How quickly does emergency tarping need to happen?
As quickly as possible — ideally within 6 hours of the storm passing if rain is forecast. Every hour an open section of roof is exposed to the elements represents more potential water damage to your decking, insulation, and interior. If you can’t reach a roofer immediately, focus on interior containment (buckets, plastic sheeting, moving valuables) while you continue trying. Most reputable roofing contractors prioritize wind damage calls and can mobilize within a few hours.
A section of my roof is completely gone — how is it repaired?
Repair scope depends on what’s missing. If only shingles are gone and the decking below is intact, replacement shingles can often be installed in a single day once conditions allow. If the decking (OSB or plywood) was also damaged or removed, the structural layer must be repaired first before new shingles go on. In either case, the area around the damage is also inspected for lifted-and-resealed shingles that appear intact but have broken adhesive bonds — these are replaced at the same time to prevent future failures.
Final Thoughts
Your roof doesn’t fail overnight. It sends warnings weeks, months, sometimes years before it gives out. The difference between a $400 repair and a $15,000 replacement almost always comes down to one thing — how early you paid attention.
But when part of your roof is sitting in the yard after a storm, you’re past the warning signs. What matters now is what happens in the next few hours. Stay safe. Protect your interior. Document everything. Get a professional tarp installed before the next rain arrives. Notify your insurer promptly. And make sure a licensed contractor is with you when the adjuster comes — not against you.
Wind damage is one of the most dramatic things that can happen to your home — but it is also one of the most routinely repaired. Thousands of homeowners go through this every storm season and come out the other side with a better, properly repaired roof and a fair insurance settlement. You will too — if you move methodically, document carefully, and get the right people involved quickly.